In this lab, we will guide through setting up your environment, for developing Javascript applications.
Step 1: Begin by downloading the Visual Studio Code, IDE. This is the IDE that we will be using throughout the class. The Visual Studio Code is open source and is supported across all MAC OS, Windows and Linux.
https://code.visualstudio.com/
Step 2: Download and install the latest version Node JS. NodeJS allows you node javascript from the command line without having to use the browser’s runtime environment.
Step 3: Install the following extensions for visual studio code market place:
- Debugger for Chrome. Extend Chrome Debugger capabilities to the visual studio code environment.
https://marketplace.visualstudio.com/items?itemName=msjsdiag.debugger-for-chrome - Download and install ESlint. ESlint is a linting tool that uses static analysis to identify errors in Javascript programs. https://marketplace.visualstudio.com/items?itemName=dbaeumer.vscode-eslint
Step 4: Download and unzip the zip from the lab [Zip]
Step 5: Install the ESLint npm package so that it globally available. This is what -g flag does. (Npm packages are files or directories contain code. These directories are described by a package.json file)
Open a terminal from visual studio code (Terminal -> new Terminal) and run the following command to install eslint globally
sudo npm install -g eslint
Step 6: Create a package.json file.
npm init -y
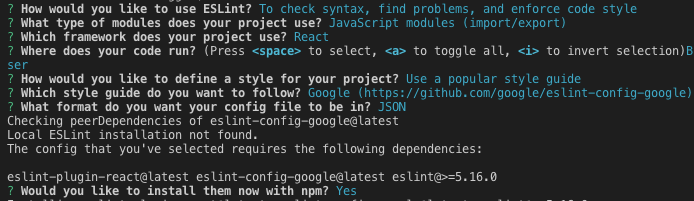
Step 7: Create an eslint configuration file by running the following command.
eslint --init
The program will ask you a series of questions. Select the answers shown in the screenshot below. (Will be using google javascript design rules)
Step 8: Open the flip.js. All five lines of the program should have been highlighted by the linter. Open the Lab Quiz 1 on collab and select the error/errors for each line. (Note that there may be more than one. So you need to fix the errors, to see) Feel to ignore yellow underlines.
