Notes:
- Work on this project individually.
- Upload a copy of your source code to collab when you are done
- You can download the skeleton code for this assignment here:
- If might be helpful to use Wireshark to inspect the packets that your DNS server is generating: dnsserverfiles-student
- Setting Wireshark in loopback mode may be helpful.
DNS Server
In this assignment, you will implement a DNS server. But this DNS server is special. Because it will intercept and modify traffic. The figure below shows an overview of the Architecture of the system.
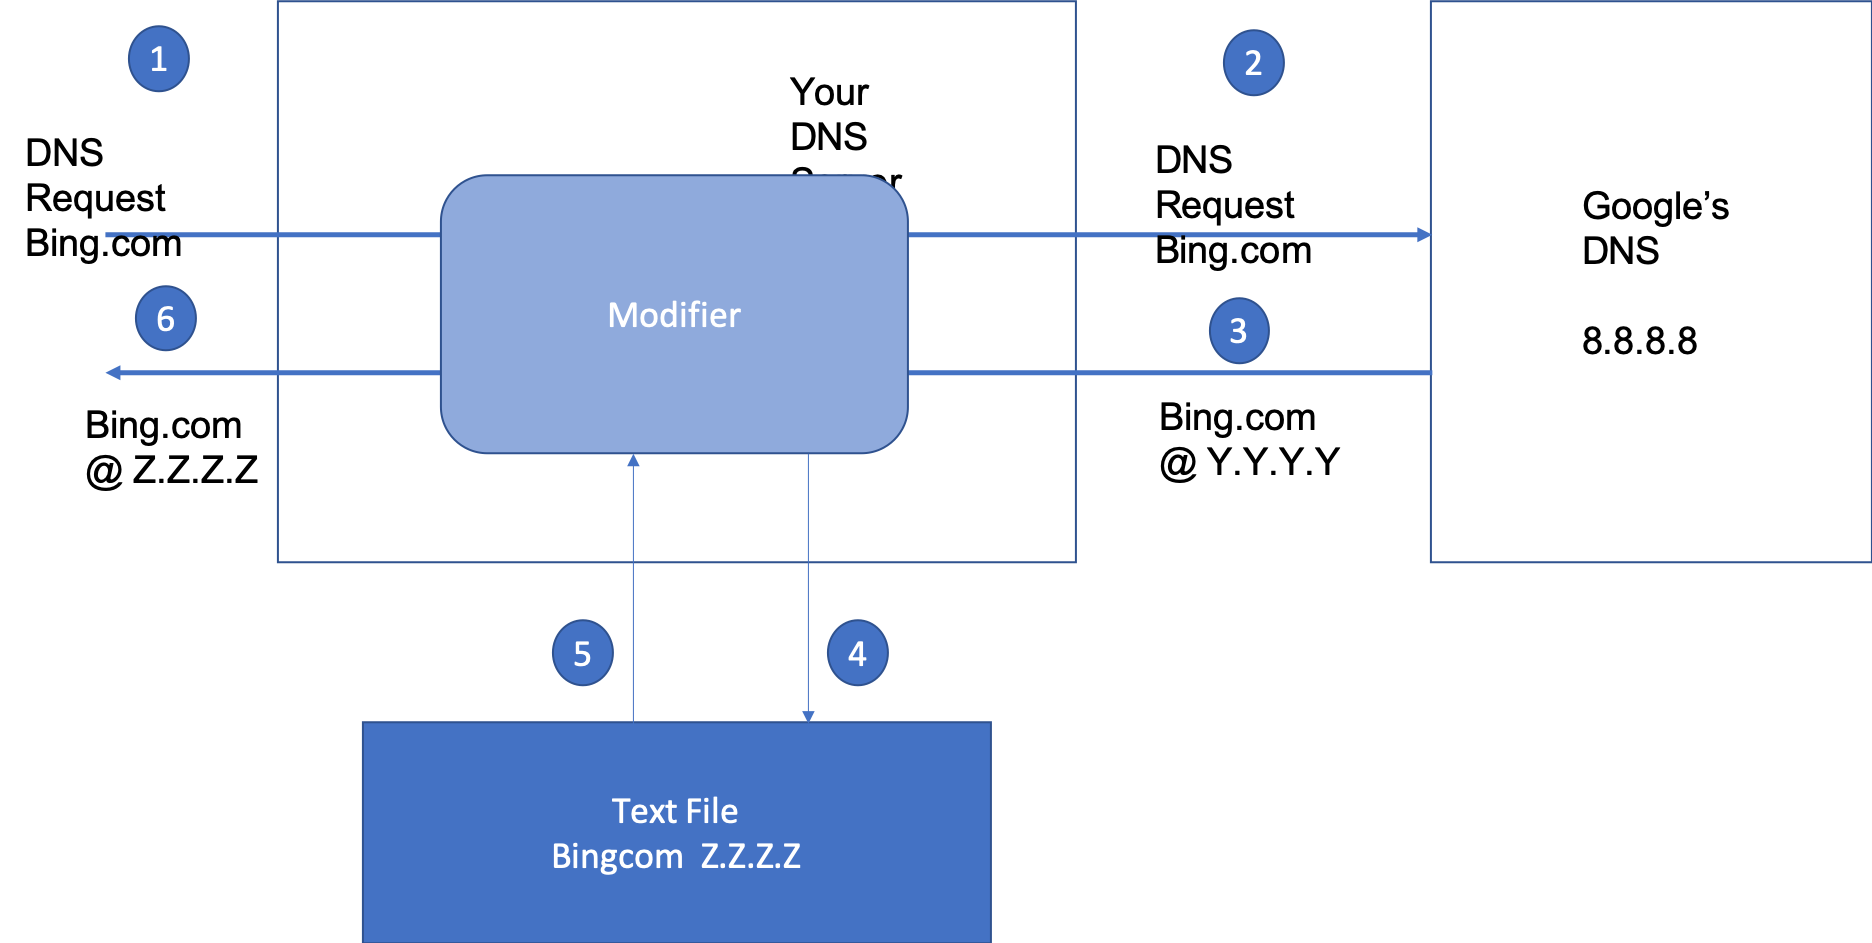
Throughout this write-up, we will use 10.0.0.1 as the IP address of the machine that is running the DNS server. (But as you implement this project you will substitute this IP address with the IP address of your machine, which you can obtain by running the ifconfig command on MacOS/Linux or the ipconfig command on windows.
Step 1: A user will create a DNS request using one of the commands below depending on their platform:
nslookup bing.com 10.0.0.1
dig @10.0.0.1 bing.com
This will generate a DNS request packet, that will be sent to your DNS server running on 10.0.0.1
Step 2: The DNS server will parse this packet and create a DNS packet object which is then sent to the modifier. We are parsing the packet instead of just sending bytes through because this allows the DNS server to also monitor all the outgoing requests and perform logging. The DNS packet is then serialized and passed to Google’s root DNS server.
Step 3: Google root DNS server (8.8.8.8) will parse the DNS packet and then return an answer packet with the IP-address of Bing.com
Step 4: When the Modifier receives this packet, it checks its text file to see if the URL that was queried is contained in the file.
Step 5: If the URL is contained in the text file, the modifier will overwrite the IP address contained in the packet with the IP address specified in the text file.
Step 6: Finally it will return the modified packet to the user hereby tricking the user that bing is at Z.Z.Z.Z and not Y.Y.Y.Y
So that is the big idea. The next step is to download the skeleton code
Implement IPV6 to and from binary Utilities.
The Utilities file is going to be the most useful for you. So begin by getting familiar with it, complete the implementation of the functions below so that they support IPv6
def binaryToIpAddress(_input_binary, _ip_version): def IpAddressToBinary(_input_binary, _ip_version):Parsing the Answer Section
Now that you are familiar with the utilities. You can begin implementing the classes contained in the AnswerSection.py file. For reference feel free to look at the questionSection.py file that was provided. Remember that you can always attach the debugger and generate test data by using nslookup or dig.
Implementing the modifier
Great now for the final section. This is where you will implement the modifier. (dnsPacketModifier.py). Feel to free read the comments for more details on how the modifier is expected to perform.
Best of luck this should be a fun project.
CNAME section bug.
The CNAME section contains a bug. You can just test your program on vt.edu. (However, feel free to fix the bug inorder to support bing.com)
Test your project
Test your project by doing nslookup http://www.vt.edu if your nslookup returns the IP-address contained in the file you have got it working.
Try looking up an address that is not in the file like http://www.cs.virgini.edu do you get the correct ip-address back.
IPV6 networking issues.
For IPV6 packets you can update the text file and modify the dictionary. You can add the IPV6 addresses to the file.
Submit:
Upload a copy of your code collab.
